Infinity AAR : Rescue Scenario
Ziggy and I finally got to put some minis on the tabletop last evening - it's been at least a month since we threw down last. It was Infinity again and I had an opportunity to use some of my recently painted miniatures that hadn't yet got to play. Now that I've got a good selection of miniatures, I can mix up the content a bit.
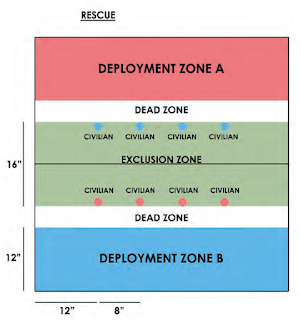
The scenario that I set up was Rescue out of the Human Sphere rulebook. We each had four civilians on the enemy side of the table that were rescue targets that we were supposed to pull back to our own side of the battlefield.


By this point, three turns had gone by. I had lost five models killed out of my fourteen and taken out two of the Knights. Most importantly though, I'd gotten one of my civilian targets evacuated back to my deployment zone, scoring a fat four points! A hard-fought victory for the Ariadna Merovingienne forces over the very tough Pan Oceania Knights.
Yeah, I know I was slack with the pictures. The reality was that because of the very tight terrain, game play was very quick with lots of movement and relatively few shot opportunities. The lack of downtime meant that we spent more time playing and less time waiting for the other guy which is when most picture taking normally happens. The game was a hoot and we both had a good time.
The scenario that I set up was Rescue out of the Human Sphere rulebook. We each had four civilians on the enemy side of the table that were rescue targets that we were supposed to pull back to our own side of the battlefield.

That translated to this on the tabletop...

I was to rescue orphans (Malifaux models) while Zig's PanO Knights were to rescue unpainted Blood and Plunder townsfolk. The yellow lines indicate that "exclusion zone."

Early into the proceedings, one of my Loup Garou chucks a stun grenade at the distant enemy. A lot of flash and bang, but nothing in the way of results.

The knights are pushing hard on my left flank, leaving the right side and one of the civilians (green circle) wide open! A Briscard and Moblot head towards her through the graveyard.

By the end of the first turn, I had led one of the targets back across to my side. You can see one of my Loup Garou down the street who'd been knocked down by a shot earlier in the turn.

The Knights' Crusader Bretheren (in black) drops in courtesy of his jetpack. We exchanged shots but I've wised up a bit since the last time I encountered this SOB; spread out and hide!
Sadly, I didn't take any pictures of it, but the Loup Garou sniper was able to set things right in the universe by putting down captain flying flamethrower. Hooray! He was soon joined in Valhalla by his Teutonic Knight brother. Again, photography was lacking but the Teutonic Knight had run around the corner and quickly dispatched my medic in the yellow jacket (towards the upper middle of the picture above). The Knight ran off but was pursued by the Loup Garou had just witnessed the carnage. As the Knight sped off, the Loup Garou quickly fired three shots. (In game-ese the LG activated and made a 4" move then fired his weapon needing 12 or less on d20 to hit. The weapon can fire three shots. Rolling the "target number" exactly indicates a critical hit with no armor save allowed.)

Not sure what the odds are of 3d20 rolled together all hitting the same result but the Knights would need a mop and a bucket to clean up the mess. Hey, there's that Crusdaer I'd taken out earlier making a cameo from beyond the veil!

Meanwhile back on the other side of the tabletop, the Father Knight made an appearance. First, he blasted my leader (not shown) and charged my Moblot paramedic. He did take a hit from the Briscard sniper (lower right) for his efforts but it would take more than that to put this gorilla down!

Ol' girl managed to go 8 seconds with Fu Manchu and did not die instantly! Unfortunately, there's nearly no way to get away from a close combat expert like this guy.

The sad plan was to set up a kill zone around the Knight and wait for the close combat to end.
By this point, three turns had gone by. I had lost five models killed out of my fourteen and taken out two of the Knights. Most importantly though, I'd gotten one of my civilian targets evacuated back to my deployment zone, scoring a fat four points! A hard-fought victory for the Ariadna Merovingienne forces over the very tough Pan Oceania Knights.
Yeah, I know I was slack with the pictures. The reality was that because of the very tight terrain, game play was very quick with lots of movement and relatively few shot opportunities. The lack of downtime meant that we spent more time playing and less time waiting for the other guy which is when most picture taking normally happens. The game was a hoot and we both had a good time.


Comments
Post a Comment